Portfolio
Documenting what I learn - Labs, CTFs, etc.
OverTheWire Bandit Levels 0 - 10
by Jason Chan
I have completed OverTheWire Bandits Levels 0 - 10, building my Linux skills. As these levels were quite short and relatively simple, I will mainly go over what I have learned instead of how I approached the problem; however, this will change once I dive deeper into more complex CTFs/Labs.
The first few levels were quite easy, as I already had some sort of basic Linux knowledge coming in; however, I have learned a few new things:
[Level 0]
I learned how to connect to a remote server by using SSH. ssh -p [port number] username@hostname.
[Level 1]
Linux has special characters, for example, “-“ is one of them. To open a file named “-“, you would have to use cat “./-“. This specifies that you want to open the file called “-“ in the current directory.
[Level 2]
To open files with spaces in their name, you have to use “\”, which is an escape character. For example, if you wanted to open a file like “open this”, you would need cat ./open\ this. However, I instinctively pressed tab to autofill (tab completion) the file name, allowing me to pass this level.
[Level 3]
Use ls with the -a flag to find hidden files. Hidden files begin with a “.” in front of the file names. For example, to create a hidden file, you would use touch .not\ hidden. - This creates a hidden file called not hidden.
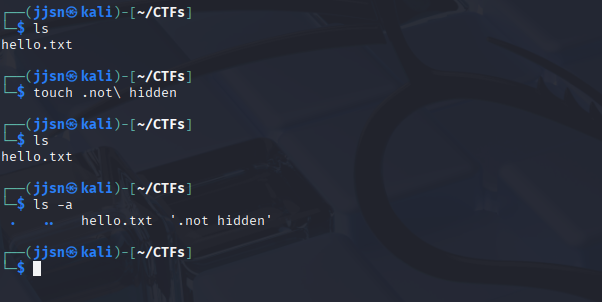
Creating a new Hidden File and using ls -a
[Level 4]
Use file [filename] to determine the file type of a certain file. This can be used to sort files from generic “gibberish” files. For example, we can differentiate files with ASCII encodings and files with just data.
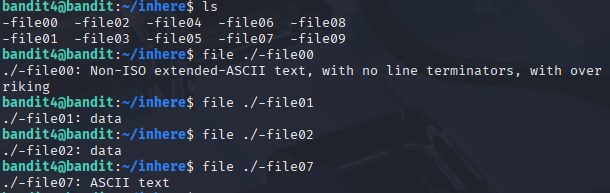
Using file to identify the content that files hold
[Level 5]
Since we knew the file size (1033 bytes), I used find with the size flag: find -size 1033c. The c at the end represents bytes. The official documentation has it as find -size n[cwbkMG]. n can be -n or +n to find files with fewer or greater than n bytes (c), respectively, two-byte word (w), 512-byte block (b), kilobytes (k), megabytes (M), and gigabytes (G). However, there are also other ways to pass this level. For example, in the description, it stated that the file cannot be executed, and thus we can use find -type f ! -executable. This command finds a type file that is not executable. ! is like a negation.
[Level 6]
To find files owned by a specific user, we use find -user [username]. To find files owned by a specific group, we use find -group [groupname]. This originally stumped me. I thought we had to find things related to permissions. I personally did find -perm -g=w (to match any group with write permissions) and then realized I had to find files owned by a certain user, group, and was 33 bytes. Combining all of these, I did find -user bandit7 -group bandit6 -size 33c.
[Level 7]
To find certain patterns/words, use grep [flag/option] pattern [filename]. For example, to find the word “hello” in a bunch of gibberish in a file called bye.txt, we would do grep -n “hello” bye.txt.
[Level 8]
Piping and Redirecting. This was definitely tougher to understand. There are many operations (>, <, |, », etc.). I will cover the basics here.
1) > : This is an output redirection; it basically routes the output of a command into a file. For example, ls > list. > is read by the terminal first, and then the file called list is created (if it doesn’t exist). Next, we run the ls command, which then sees everything in the current directory (and list). The results are then transferred into the list file.
2) < : This is an input redirection, the opposite of output redirection. Basically, when you use <, you are feeding a file to a command. For example, sort < file.txt would read from file.txt and sort it. However, the existing file.txt will not be changed because sort prints out the STDOUT (the terminal) normally.
3) | : Piping basically feeds the output of the left program as input to the right program. For example, sort data.txt | uniq means to sort data.txt and then feed that sorted text file into the uniq command, which gets rid of consecutive unique duplicates.
4) >> : Like output redirection, HOWEVER, instead of overwriting, it APPENDS.
5) All of these operations can be nested.

Credit to RyansTutorials
So what is happening in the picture above?
1) We redirect the contents of barry.txt into STDIN and feed it into wc -l.
2) wc -l counts the # of lines in barry.txt, which gives us 7.
3) The number 7 is then used with the output redirection >, routing it to myoutput.
4) Printing myoutput resulted in 7.
All of this was learned to solve Level 8, where we had to find the password in a file filled with duplicates. What I did was sort data.txt | uniq -c | grep “ 1 “. So first, I sorted data.txt to make sure everything was in order (including duplicates). This was to make sure that uniq -c can count duplicates (it only counts consecutive duplicates). The flag - c prefixes each line with how many duplicates there are in the file. We used this because after sorting, all duplicates should be consecutive or next to each other, allowing uniq -c to effectively count. Then we used grep “ 1 “ to find the unique password in the file.
[Level 9]
Password is a readable string with ==== preceding it. It had a bunch of “junk” around it, so I used strings -a n 3 data.txt | grep “====” to find the password. strings -a n 3 data.txt basically tells the terminal to output anything that matches a string with a minimum length of 3. And then we pipe the results of that to grep to find the pattern that exists in the password.
[Level 10]
This level was fairly simple, read the documentation and use base64 -d to decode data.txt. Although it did take me a bit to wrap my head around base64. Basically, base64 encodes things into 6 chunks of bits.
For example, to encode Hel (3 bytes = 24 bits), we have in ASCII… 01001000 01100101 01101100 (H e l)
Now we split these into 6-bit chunks…
010010 000110 010101 101100 and then convert each of them into Base64 Index.
010010 -> 18 -> S
000110 -> 6 -> G
010101 -> 21 -> V
101100 -> 44 -> s
We encoded H e l (from ASCII) to base64.
Very lengthy post, I have learned a lot, and will continue to learn. Next post will probably be on TryHackMe CTFs and networking.
tags: